Pictures in the picture library
Add pictures
1. Go to Pictures. Look through your picture library by clicking on the folders.
2. Create a New Folder and name it. Alternatively select an existing folder to add pictures.
3. Click Add Picture.
4. Select pictures, several, all or only one. It is also possible to add pictures by right-clicking inside the library and choose Add Picture.
Picture types supported by Shoppa/Mediablob:
- • JPEG (*.jpg; *.jpeg)
- 8-bit
- RGB
- CMYK
- Grey
- • PNG (*.png) Supports transparency.
- RGB – Indexed + 8 bit, 16-bit
- Grey – 8 bit, 16 bit
- • TIF (*.tif; *.tiff) RGB supports transparency.
- RGB – 8 bit, 16 bit
- CMYK – 8 bit
- • BMP (*.bmp)
- RGB – Indexed + 8 bit
- • GIF (*.gif ) Supports transparency.
- RGB – Indexed
- • WMF (*.wmf )
- Bitmap
- Vector
- • EMF (*.emf ) Has better support for printer drivers than WMF.
- Bitmap
- Vector
- • EPS (*.eps ) Requires the AddOn ConvertOnServer.
- • PDF (*.pdf ) Requires the AddOn ConvertOnServer.
Note that the information below will not apply in later versions of Shoppa from 2:16.
Images of correct type that are larger than 1 MB are automatically re-saved by Shoppa to smaller JPEG files. The exception are PNG files which can be up to 2 MB before they are re-saved by Shoppa. We recommend an image to be 1500 pixles on the broadest way for it to be able to be printed in formats up to 700×1000 mm.
Tip from Shoppa!
Picture sizes supported by Shoppa version 2.18 are; 1 MB, regardless of transparency.
You can also import pictures up to 3MB with the help of our AddOn Bigger Pictures. Pictures with transparency can go up to 6MB using this AddOn.
Information for users of Shoppa 2.15 or earlier versions
Picture transparency
Note that the information below will not apply to Shoppa versions from 2:16 onward.
Vectorised pictures that are supposed to be transparent are saved as WMF (if smaller than 1 MB) to maintain its transparency. If the picture file is larger than 1 MB, Shoppa will automatically re-save it to a JPEG and the image will lose its transparency. Product pictures that are supposed to be displayed without background are saved as a PNG (if smaller than 2 MB) to maintain its transparency. If the picture file is larger than 2 MB Shoppa will automatically re-save it to a JPEG and the picture will lose its transparency.
Right-click options
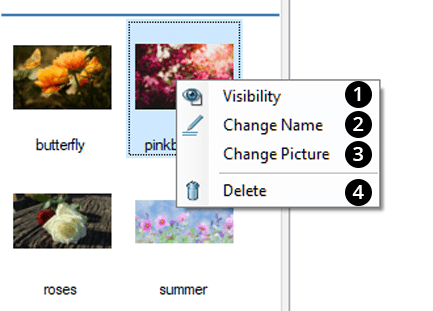
You can see all the picture options by right-clicking a picture in your library.
- 1. Set the Visibility for your stores, make the picture public or hidden.
- 2. Rename the picture by clicking Change Name.
- 3. Change Picture = replace the current picture with another picture. This changes the picture in all templates it is being used in, which can be very convenient and time saving.
- 4. Delete picture.

Tip from Shoppa!
From version 2.18 onward, it is now possible to export a template as a picture. Hold down the buttons Ctrl + Shift + E on your keyboard, then Set picture size and where the picture should be exported to. Note that you need to have the Add-On called SaveAsPicture for this function.
