
Managing layouts
This chapter explains the benefits of working with layouts and how they are best managed. By using layouts, you can create multiple formats that belong together for easier and quicker management of printing different types of signs.
Formats in the same layout
In order for multiple formats to be placed under the same layout, these must be proportional to each other. This means that a horizontal format cannot be placed under the same layout as a portrait format.
Formats in the same layout will get the same components, which means that you only need to edit in one place and it will have an effect on all underlying layouts. For example, if you change an picture in the first format, the picture will also be changed in the rest of the formats.
Place items in the Stack folder
The formats under the same layout are subject to the same changes. Meaning that adding an item to one of the formats will also be visible to the others.
NOTE! Items that are deleted from one layout will be deleted from the other layouts as well. If you want to get rid of an item from one format, but still keep it in another format under the same layout, you need to place the item in the Stack folder for secure storage. Simply drag and drop the item into place.
- 1. Click on the Stack tab.
- 2. Drag the item(s) from the template (you can select several items at the same time by holding down shift).
- 3. Release the item(s) in the Stack folder in the right column.
Import items from Stack
After having created a template with multiple layout and you wish to add an item afterward, you can easily import the item to your template from the Stack folder.
1. Select the items you want to import.
2. Click the arrow at the bottom of the right-hand side.
3. The items will automatically be placed in the same position as they are in the other layouts.
Link layouts
By linking layouts you can make changes to an item that exist in all layouts, from one place, and the same item will automatically be changed in all linked layouts. So this function will save you both time and effort, because it includes the ability to change the color of elements, fonts and font sizes. However, the function will not apply if you want to move an item around in the template.
1. Select the layouts you want to link by holding down shift and clicking on their names.
2. Click on the Link icon (the linked layouts will be marked with a small Link icon ).
Now the layouts that you selected are linked. To undo the link, repeat the procedure.
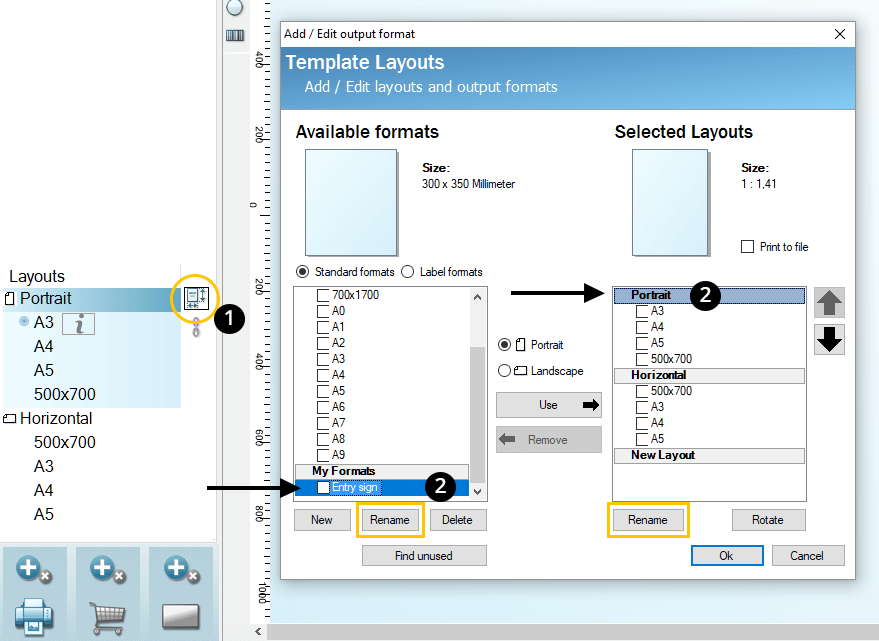
Rename layouts
We recommend that you name the layouts that you create according to their function or appearance. This will help you manage the layouts and will especially help the Shoppa Plus users (stores) to find and use the right layouts when needed.
1. Go to Layouts. Click on the icon for the Template Layouts window.
2. Here you can select the one you want to rename and click Rename. Click Ok when finished.
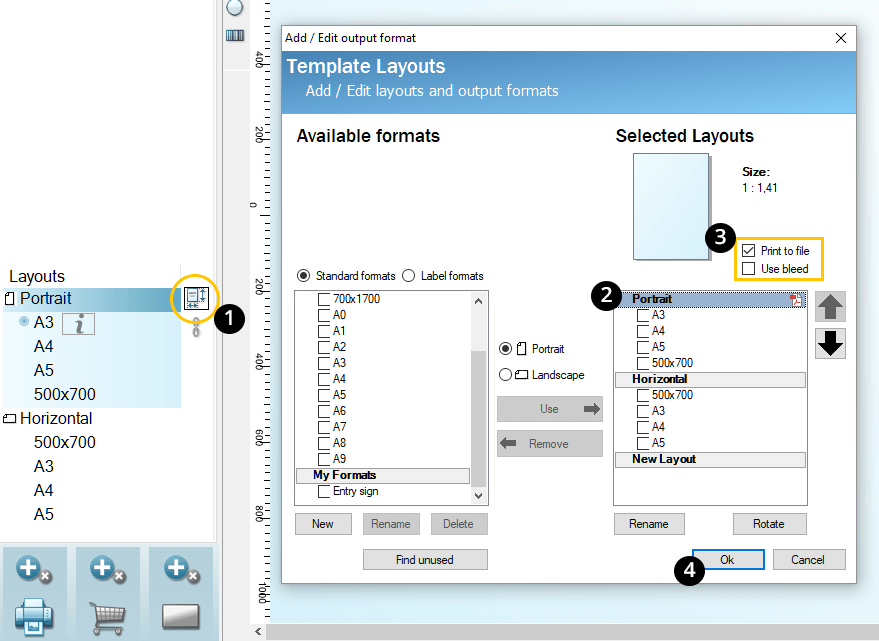
Setting a layout for high-resolution PDF (Add-On)
A layout can be set to generate a high-resolution PDF instead of a printout.
1. Go to Layouts. Click on the icon for the Template Layouts window.
2. Select which layout should generate PDF:s.
3. Tick the box Print to file. Choose also Use bleed if desired.
4. Click Ok.
In order to be able to print the layout on paper again, the procedure must be repeated and the box Print to file must be unticked.
For more information about this Add-On, contact our support.

Tip from Shoppa!
Click the Template Layouts to access all the layouts. From version 2.18 onward, it is also possible to see which formats are not currently in use.