Create a template
When you start creating a new template, you must specify at least one format (size and composition of the paper) to begin working on the template. In this chapter, we will show you how to add and create formats and layouts. Thereafter in the upcoming chapter Managing Layouts, you will learn more about how to save different sizes combined with different looks/layouts within one and the same template.
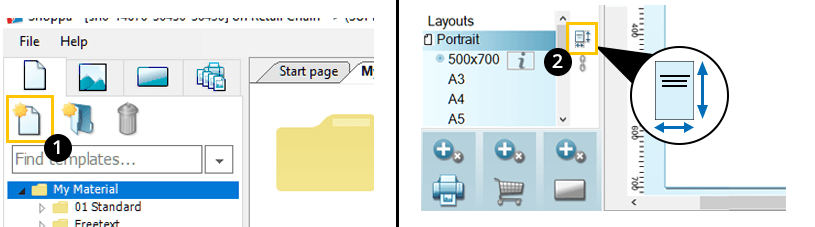
Access the Template Layouts window
There are two ways you can access Template Layouts window.
1. When you create a New Template.
2. Click on the paper symbol next to the layouts, when you are in the Design mode.
Create a standard format
Instructions
1. Select Standard formats. Select your format/s.
2. Select orientation; Portrait or Landscape and click Use.
3. Your formats are placed as layouts. Change the order of the layouts if needed, using the arrow icons next to the layouts. Add other layouts by clicking New Layout.
4. Select formats. Select orientation. Click Use. You can see a preview with more information of your selected layout under Selected Layouts.
5. To keep track of the different layouts, we recommend that you rename them.
Example: Horizontal and Portrait.
6. Click Ok.
Tip from Shoppa!
You can have several formats in one layout. Formats sorted under the same layout will always match their formats and orientations.
(Meaning that it is not possible to combine e.g. a horizontal and a portrait format in the same layout.)
Example: The formats A4, A3 and A5 can all be used in the same layout.
Create a label format
When printing labels, Shoppa helps you save paper. If you print many labels at the time, the labels will be placed and printed on the same paper, so that as many labels can be placed per paper as possible.
Instructions
1. Select Label formats. Select your format/s. A preview will show under Available formats when you click on a label format.
2. Select a matching layout alternatively New Layout. Click Use.
3. If there isn’t a suitable format available, you can easily create and customize a new label format. The format of the paper that labels are printed on is per default A4, this can be changed. The position on the paper can also be changed.
4. Name the label (format).
5. Determine the number of rows and columns.
6. Set offset around labels if needed (either different offsets on each side, or tick the box for Equal offsets measurement on each side). Click Ok.
7. Select gutters if needed.
8. Select your new label format and place it under a layout. Click Ok.
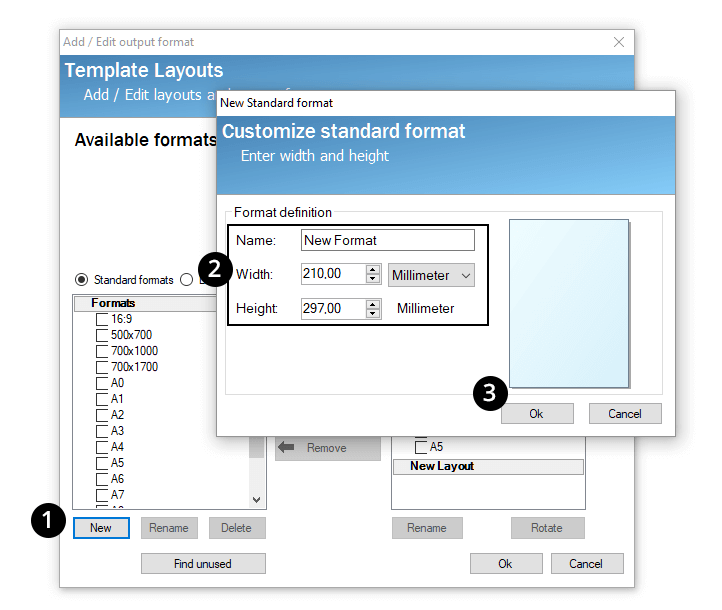
Create and customize a new standard format
1. Start by clicking on the New button.
2. Name the format and set the measurements.
3. Click Ok.
Now the new format will appear below the My Formats row in the Template Layouts window.
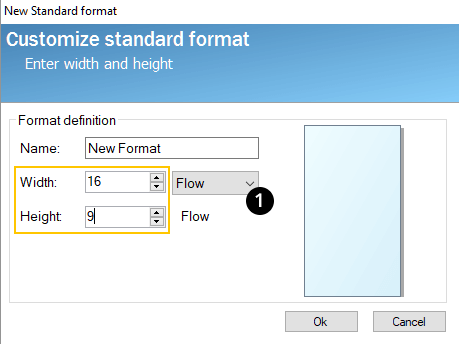
Create a Digital Signage format (Flow) (AddOn)
To create a new Digital Signage format, you must do the same as when you are going to create a new standard format. But instead you use Shoppas own dimensions adapted for digital screens.
1. In the Customize standard format window, adjust the settings to a digital screen, with the unit Flow; width 16 and height 9.
Our Digital Signage (Flow) comes as a separate Add-On and is managed by Shoppa. For more information about this, contact our support.