Print via Printshop

Printshop is a service option that Shoppa offers especially for large-format printing. This is done with a print connection directly from Shoppa to an external printer, for example with a connection to a printing company. 

Print via Printshop step by step guide

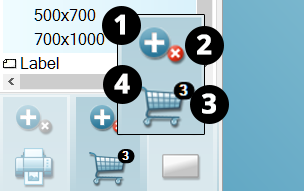
Click on the buttons inside the tabbed menu

Add to Printshop queue

  • 1. Add the signs to the shopping cart by clicking the blue plus icon.
  • 2. To clear the Printshop queue, click on the Delete Printer Queue icon (the red x icon).
  • 3. A small number appears next to the shopping cart which indicates how many signs are queued to Printshop.
  • 4. Once all the required signs are queued, click the Send order icon.

Order from Printshop

  • 1. If you have Printshop attached to your account, you only need to go through 3 steps to complete your order. Step 1 is the Current order box.
  • If you have multiple Printshops linked to your account, you need to go through 4 steps to complete your order. Step 1 is the Select Printshop box (see inserted image).

  • 2. In the column under Sign you can view thumbnails of the queued signs.
  • 3. In the column under Format you have the option to resize before sending your order.
  • 4. In the column under Copies you have the option to change the amount of each sign, as well as the option to delete formats.
  • 5. Click Next.

Enter information

  • 1. Enter your Delivery address in the form.
  • 2. If you prefer, you can add Multiple addresses by clicking the letter icon.
  • 3. Click Next.

Confirm and send

  • 1. Enter a discount code in the Coupon field, if any.
  • 2. Review your order and confirm the terms and conditions.
  • 3. Click Send.

Payment Selection

  • 1. If you don’t have funds in your Shoppa account, the Payment Selection box will pop up. You can select to be invoiced only for the ongoing purchase, which means a larger administration fee will be added to your order. Alternatively, you can add funds to your account in advance (against invoice) to ensure that you have enough funds to cover future orders. In this way you will also save on the administration fee.
  • 2. Enter the Invoice address even if you have already entered the same address as the recipient address.
  • 3. Accept the Payment conditions.
  • 4. Click Buy credit to send your order.